Working with Lightroom
By Frank Crebas and Frank Noort

The latest addition to the Adobe Photoshop family is Lightroom. This all-new program is meant to be a one stop shop for photographers who would like to store, develop and publish their precious photos. Besides the strong RAW development module Lightroom offers various ways to store and organize files with metadata and makes it possible to add keywords to your files in a very easy way. This option is great for the spotters/aircraft photographers amongst us and it makes it possible to find a desired picture of a specific airframe with a simple search. In this overview we look at some of the most relevant features of the application and offer you a quick guide how to start organizing your files.
Workflow
Adobe Lightroom is a workflow management tool for digital images. In the old days, when we were still taking slides, our workflow would be something like this:
- View the returned slide film, hold it against the light
- Decide which ones to mount .
- Mount the selected slides, number them and put them in your storage box
- Add the data like slide number, registrations etc in a database
- Put the unmounted slides in a shoe box or whatever.
- Take the mounted images to a shop to make (enlarged) prints of them.
Lightroom offers the same functionality, but now for digital images. It facilitates a workflow to select the images you want to keep and enhance, store them in a database and export them to a website, a slideshow or print them.
For many of us this is a tool that we have been waiting for. It makes handling digital images much more efficient because you will be able to edit and enhance multiple images with only a few keystrokes which reduces a lot of Photoshop work. Professionals claim that Lightroom has reduced their use of Photoshop by some 80%! Of course there are other similar photo organising tools like Picasa, Thumbsplus etc available, but they are missing one important thing: RAW image handling.
RAW Images
If you are a frequent visitor of photography discussion forums, you have probably seen lots of discussions on the benefits of shooting in RAW format. On most professional digital reflex cameras you can select the format the way images are stored. This can be compressed and optimized in a JPG format, or a raw stream of data, unformatted and uncompressed. These RAW images can then be used later using image editing software like Adobe Photoshop to optimize them as much as you want.
Since the community switched to digital, more and more photographers switched to RAW because of its benefits. Editing images in Adobe Photoshop is great, because of the endless possibilities to enhance your pictures, but it is quite a time-consuming process. Thanks to Lightroom this process has improved a lot.
It is not possible to edit RAW images as the file is such a format, or should we say, without a format, that data can�t be written to the file. Adobe has found a clever solution for this: All changes which are made using this program are stored in a small file next to the RAW image. Other programs, especially in the Adobe suite, recognize this way of working as well and take up the process wherever you left off with Lightroom. This function makes Lightroom unique, but also the other possibilities are worthwhile to mention as well.
Program structure
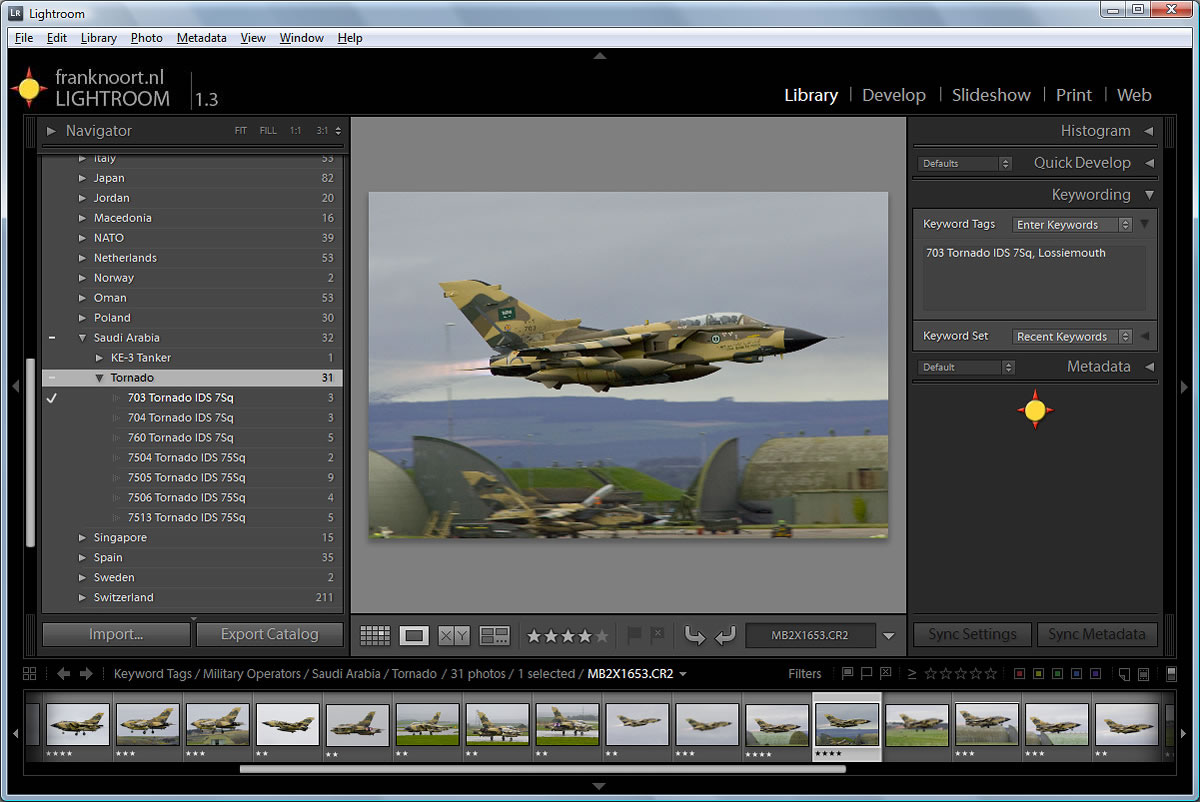
At the top bar you will see five menu options: Library, Develop, Print, Slideshow and Web. We will go deeper into the Library and Develop menus in this article.
![]()
 Managing Your Library
The library mode in Lightroom gives you the possibility to organize your pictures using keywords. Once you have a large amount of pictures stored, then the menu options in this Library mode are quite useful to make selections of the pictures you want to see. There are several options possible to make these kind of photo selections from your library which can be found on the left side of your screen. The possible selections can be made the following way:
- Through the main library
- Through the �Find�option
- Through the Folders selection
- Through selecting Collections
- Through selecting Keyword Tags
- Through the Metadata Browser
The Main Library
Through the main library you can select all the pictures in your library but it is also possible to create a quick selection to work on and view the images.
The Find Option
Finding images is a piece of cake using the find option in Lightroom. It is, however, necessary to be consistent in adding keywords to your images, to make the find option more effective.
Folders
You probably have your images already stored in several folders at this moment. Many people use a folder system on their computer to store images related to a certain event in one folder. Examples are �TLP 2007-02� Or �Schiphol May 2007�. When you import images into Lightroom, it will create the same structure within the program as you have currently on your computer
Collections
You can also create selections by specifying multiple keywords and using the find option. For example, if you want to create a collection with all your images of the C-130 Hercules you can use the find button to find them and then drag them to your Hercules Collection. A collection within Lightroom is just a selection; the photos are not copied or moved to another location on your computer.
Keyword Tags
For people willing to spend some time to organize their complete database of digital images, this is where the party starts. Over the last few months we have spoken to many people and all have a different view on this. Some people do not bother and think it is a waste of time to add a number of keywords to each and every photo; others enjoy the benefit of having a bit of organization in their library. We will look deeper into this in the �Lightroom Spotters Guide� chapter a bit further in this article. It is essential to define your keyword strategy before you begin. It is possible to add keywords for serials, aircraft type, operator, location etcetera and would be wise to define the level of detail and desired structure before you begin.
To get your images into Lightroom you will need to import them. This process will be explained later in this article. When importing your images from the folders of your computer it is already possible to add keywords to the images. You can also add keywords later by dragging and dropping keywords to selections of images, or one by one if you like. The options are endless!
Metadata Browser
Each digital camera stores so called �EXIF� data in the images. Data like shutter speed, aperture values, lens, camera brand and model, but also time and data are stored here. Using the Metadata Browser it is possible to select pictures you made with your 300mm lens, or all pictures from 2005 etc etc.
Tip: All the data like keywords and metadata you enter into Lightroom is stored in the Lightroom database. To enable other programs to see the keywords and to import the same data into Lightroom versions on other computers, make sure to select the option �write metadata changes to XMP� on. This can be done in the menu edit/preferences/file management.
Lightroom for aircraft photographers
The Workflow again
Remember the workflow you had when still using film? Your most effective way of working came from years and years of experience. Here is a suggestion for a workflow which we found rather useful when importing, storing and enhancing pictures with Lightroom. You have to find your own ways of working of course, and the more you will use the tool, the faster the process runs. The trick is not to get distracted and leave the process, starting doing other things.
We can identify the following steps:
- Importing pictures
- Selection Process
- Editing
- Adding Keywords and quality flags
Importing Pictures
Use File/Import Pictures to import your images from a selected folder. Do not forget to select the images from the folder you want, standard Windows controls will do the trick for selection. When importing images you can choose to move the files to another folder or import them from the current folder. The latter seems to be the best option if you do not want multiple copies of your files on your hard disk. Do not forget to make a backup before you begin! There is also the option to edit standard metadata when importing. In the submenu �information to apply� you can add copyright information and your name. You can also add Keywords here, but we suggest to keep the information limited here as each photo probably has its own characteristics. You could add location information and ICAO code here if that information applies to all images you are importing. Importing images is a bit of a slow process. People who use Picasa or Photo Mechanic are probably used to a faster way of working than this.
Don�t forget that Lightroom offers you the possibility to import scans as well. Metadata will like camera equipment will not be imported, but you can still add keyword data.
Selection Process
If, after a few cups of coffee, the images are finally loaded, you can start selecting the images that are worthwhile to keep. Of course, all your images are worthwhile and beautiful but with the high speed cameras we all use and due to the fact that digital images are for free we tend to make much more pictures than necessary. Lightroom offers some �views� to enable you to browse through the images and select or deselect them. Press the �G� key to go to �Grid Mode� or �N� to �Survey Mode�. With the right and left arrow you can browse through the images and by using the �P� and �X� keys you can simply flag the images to indicate if you want them in your library or not. P stands for Pick, X for delete. The X option does not remove images from your library; it simply adds a little black flag on your screen.
Editing Images
When you are done selecting you can use the filter option at the bottom of your screen to only show the white (�picked�) flags. These are the images you would have mounted in the old days and you would like to keep. You can move the images with a black flag to another folder if you wish or simply remove them from your library or even delete them from your computer.

Editing images is done in the �Develop� mode. Press "D" to enter this mode. Editing images is a bit different from Photoshop although the same options exist. Best option is to work your way through the editing options from top to down. We would be delighted to give more information about editing images in Lightroom, but then we would fill the complete edition of this Scramble. As already stated, the great thing about editing in Lightroom is that all the changes will not be applied to the images themselves but only to an XMP file next to your image. You can edit anything you like, you can always revert to the original images. This only applies to RAW images, which is why this tool is so great for people shooting photos this way.
Adding Keywords and Quality Flags
Adding keywords can only be done in the Library Mode. Type �G� or �N� and you will the see the add keywords menu on your right. You can also drag and drop keywords from the existing keywords panel on the left side of your screen to your pictures.
Before adding keywords for the first time you should consider your strategy. What kind information do you want to store and be able to search on? Probably you want to enter the aircraft type and the operator, like a civil operator or an air force. You might also want to note down the squadron or wing or even the aircraft serial. There are several options to add key words. You can add them as one string like �J-066 F-16BM 323 Squadron RNLAF Leeuwarden Orange Jumper� or you can use commas to enter your keyword in which case it would look like �J-066, F-16BM, 323 Squadron, RNLAF Leeuwarden, Orange Jumper� The latter option will create 5 different keywords that you want to categorize, the former creates just one keyword. It does not really matter when using a simple �find� option, but it allows for more complex search criteria should you wish so in the future.
When adding keywords to large collections you will see your keywords list on the left side of your screen growing rapidly. It is possible to create a Keyword Tag structure. By using Keywords that are a child of another keyword you can even create a complete tree. Like this example:
 If you have a large screen with a good resolution, the �grid� view is ideal. Here you can easily search for pictures or work on your library. As you can see on the left, there are several ways categorizing pictures in Lightroom.
You can drag and drop keywords to other categories if you like. The downside is that you can only drag one keyword at a time.
If you are adding keywords you can also easily add flags concerning the quality of the images. By simply pressing the 1,2,3,4 or 5 keys you can rate the pictures with stars. You can also rate the pictures with color codes. When finished you can make selections like: Show me all 3 star pictures or higher of Swiss Air Force F-18s at Meiringen. It is some work, but very much fun to do. At least that is what we think.
Lightroom is available at www.adobe.com/lightroom
